

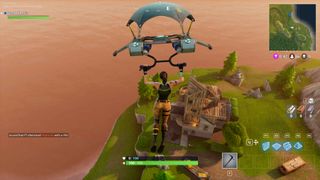
Choose the right landing spot on the ever-changing Fortnite map and your inventory will soon be bursting with weapons and ammo. Drop into the wrong location, however, and you’ll be a fish out of water, running around aimlessly with nothing but a useless pickaxe until another player puts you out of your misery. Our guide to the best landing spots on Fortnite’s map will make sure the latter doesn’t become habitual.
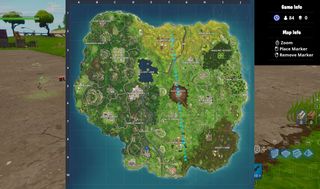
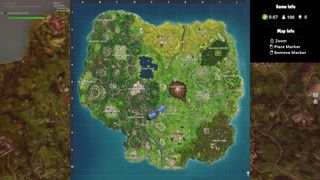
Season 4 of Fortnite blew open the center of the map, added Risky Reels in the northeast and a new soccer stadium to the northwest. And with Fortnite Season 5, three new areas arrived while Dusty Divot was reclaimed by nature. For Fortnite Season 6, the giant cube has changed the landscape of the map in multiple ways with its theme of “Darkness Rises.”
Most of the spots featured here are away from the major, named locations, mainly because you already know what you’re getting if you go there: lots of loot and lots of enemies. They’re perfect for practicing with the game’s guns, but not so good if you want to consistently reach the latter stages of a round.
New and improved locations in Fortnite Season 6
Fortnite’s map has been an ever-changing landscape throughout 2018, thanks to Epic Games constantly updating the location in fun ways. But throughout multiple transformations, some areas on the map have remained the same.
While areas like Dusty Depot became Dusty Divot and Tomato Town became Tomato Temple, many points of interest on the island were lacking, and left players without much reason to visit them. Thankfully, this has changed for multiple locations on the map in update 6.0. Those areas you’ve been avoiding like the plague for the past few months? You might want to check them out now.
Loot Lake

The most readily obvious change is to the island’s central location, Loot Lake. After the cube made contact with the water and turned it into a bounce pad for a few days, it has now risen and taken the center island with it.
The center island now floats above the lake itself and presents new looting opportunities. The same can be said for the rough waters underneath the vortex, which is now littered with cars that can hold chests and more loot.
You don’t have to land on the island to make it up there, though—jumping into the vortex will carry you up all the way to the top, and you can even launch out of it with your glider to move to surrounding areas.
Wailing Woods

One of the coolest new additions is a massive underground bunker in Wailing Woods. The small building at the center of the hedge maze is gone, instead replaced with a doomsday bunker that is fully equipped with security cameras.
The bunker itself is pretty huge, and it has many loot spawn locations and chests. There’s even a one of the few remaining rifts down there, so you can loot it all up and then hightail it out of there with ease and speed. If the bunker’s not your thing, several cabins have also been added in the surrounding area inside of Wailing Woods, too.
Haunted Hills

The northwest area of the map has been improved with a new Haunted Castle. It’s on the mountain to the east of Haunted Hills.
The castle has multiple chest spawns along its high walls, but there’s even a mini-dungeon area in the center of it with more loot spawn locations. It seems like a decent place to land and fight.
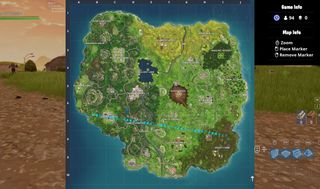
The map improvements aren’t limited to named POI’s, however—all of the locations that were marked with runes by the cube in its travels around the map have now changed as well. They feature rocky areas that have been somewhat terraformed, and they often include chest spawns, too. These areas are also home to the new Shadow Stones, which turn you invisible and give you the ability to phase through walls.
Basic tips and the best landing spots
Fortnite for first-timers
We’ll jump into specific locations soon, but first, here’s five tips to think about on your descent, no matter where you’re aiming. And if you’re after tips for the game more generally, here’s a good list.
1. Catch people unaware as they leave major locations
If ten people land on a town, then one person will make it out alive with all the best loot. One advantage to dropping away from those locations is that you can gear up and then swing back around, catching those victors unaware when they think everyone is dead. If you can get a clean shot at somebody without them knowing where you are then you’ll have the upper hand, no matter how good their weapons are. And if you kill them, the spoils are all yours.
2. Drop late if you want peace and quiet
Most players will impatiently drop earlier in the Battle Bus’s journey because they don’t fancy waiting around. Use that knowledge to your advantage. If you’re after action, drop early. If you want a slow and steady game, leave it late.
3. Go the distance
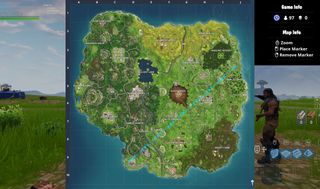
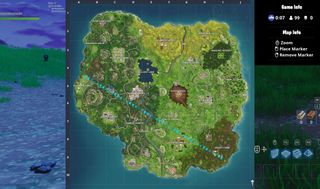
The further the drop location you’ve picked is away from the path of the bus, the less resistance you’ll meet when you land. So, if the bus is hanging left on the map, the named locations on the right will be less busy. Pull your parachute early to travel further (the map is small enough that you can reach pretty much any location).
4. If you’re playing solo, head for more secluded spots
If you’re alone, you can get away with heading for smaller drop spots. A chest or two will give you enough gear to get your started, but trying to spread that across a duo or a four-man squad is difficult. So, if you’re playing with friends, aim for larger locations than you’re used to.
5. Keep your eyes on the sky
This is the most important thing to remember when you drop. You need to be aware of both where you’re aiming and where other players are dropping around you. Turn around in the air and look for parachutes, making a mental note of where others have landed. The more information you have, the better shape you’ll be in for the ensuing fight.
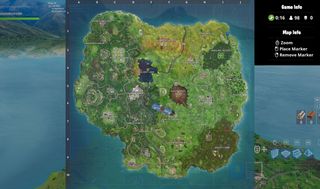
Without further ado, here are 12 drop locations that will set you up nicely for a Victory Royale.
The corrupted areas left by cube runes

Landing at any of the seven locations where the cube left runes around the map is a pretty cool idea. Not only are there loot chest spawns, but they are always near named locations if you need to re-route or loot up close by. They are found throughout the map, strategically placed in formerly empty areas, making the island more full of loot than ever.

Season 6’s new Shadow Stones can be found here as well, allowing you to turn invisible, move faster, and phase through walls. It’s a solid stealthy option in the early game. Not only that, but these areas are often full of stone materials to farm.
The abandoned town southwest of Paradise Palms

For an unnamed location, this might be the most consistently loot-dense areas in all of Fortnite. Paradise Palms pulls most of the try-hards, leaving this town fairly empty. Hit the western edge first and check the second story of each house for ground loot and chests. Work your way through the town, keeping an ear out for footsteps, and you’ll likely find six or so chests by the time you need to rotate out of there.
Depending on the storm circle you get, rotating naturally along the road cutting through the desert area is a good plan. You’ll have some nice views into Paradise Palms, and with all that loot from earlier, cleaning up the leftover players is usually a cinch. If the storm circle is further away than you thought, look around for a rift or golf cart and get the hell out of there.
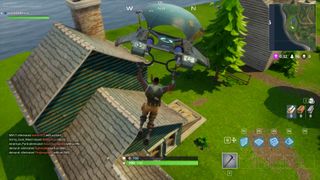
Compound north east of Flush Factory
Drop directly on the southeast corner of the compound, marked by a tall chimney that sometimes has a chest on top. If you grab that, you’ll be the first to have a weapon, so make sure you know where any nearby enemies are to take them out.
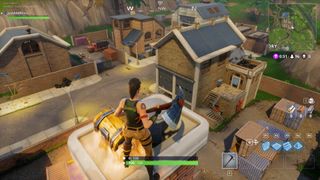
From there, loot the large building that the chimney is coming from, looking inside the metal containers and upstairs for chests (you can find two if you get a good dice roll). Listen for footsteps because it’s an active spot. The trucks and containers out in the open between the buildings usually house a few more chests, while the buildings normally have one each.
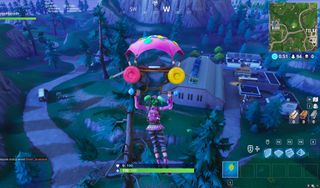
Season 4 added a new warehouse club to the area. It makes for a decent landing spot to get any chests up in the rafters, but the music drowns out the noise of other players, so be careful. It’s a bit dim, so they could be hiding anywhere. If not, be sure to get a quick dance in.

Another angle of the area with the dance club barely in sight beneath the yellow button.
If you can come out on top, you’ll be all set up for the long haul. This is a good place to go in duos or squads if you want to avoid the named locations.
The large tree to the northwest of the Wailing Woods

You’re pretty much guaranteed a chest or two and a good spot on the map here, but I’d only recommend this spot if you’re playing solo. Aim for the large tree, and while you’re dropping take a peek at the high ground to the south. You’ll usually see a weapon on the ground. Grab it, and head for the trunk. The tree can spawn two chests if you’re lucky, and you’re bound to be the only one there.
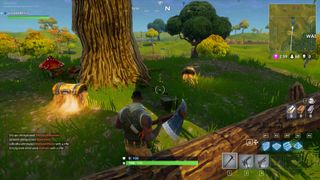
Now you’ve got a few options. If you head for Tomato Temple you’ll arrive on some high ground overlooking the bulk of the buildings, so you’ve got the advantage on any stragglers. You can head directly northeast to the two nearby houses, one of which has a basement.
The tower at the far northeast of the map
This one’s an old favorite that still warrants a look in after the map updates. Tucked in the far northeast corner of the map is a tower that can spawn three chests (and I swear I’ve seen four here in the past), and just to the west is an ice cream truck that can spawn a further two. The first chest location is right at the top of the tower, so land on the roof if you see a glow of yellow through the wood.
However, there’s sometimes one on the exposed west side of the tower (you can see it in the picture below). If you see it, feel free to grab it so you have some loot guaranteed. This used to be a popular spot, but I rarely face any enemies here following the Season 3 update and into Season 4, unless the bus is passing right overhead.
When you’re done, head towards Risky Reels or Lazy Links to see if you can vulture some weak players or find any leftover loot before moving to the safe zone.
The mountain to the north of Salty Springs
This isn’t the best looting spot, but you’re guaranteed a fun fight as well as a strong position bang in the center of the map.
Basically, it’s a multi-stepped mountain that usually has two or three chests hidden away, one of which is at its highest point. Make sure you get to the peak before anyone else that’s had the same idea.

Remember when Dusty was a young crater?
If you can, get a look at the hill from all angles before you land to locate all the chests, then track them down. You’ll likely have company, but with some quick thinking you’ll come away with the best weapons. When you’re done, head for Salty Springs. Dusty Divot is a possibility too, but especially now that it’s filled in with trees. Just be wary of anyone hiding among them.
The houses west of Shifty Shafts
Dropping at Shifty Shafts is not the worst idea. It’s busy, but I’ve found it to be less busy than a lot of other named locations. Plus, it’s a bit of a labyrinth, so you can normally limit your firefights to 1v1 battles. The best thing to do is look for weapons as you’re gliding in, and head for the best one.
However, I think that starting at the houses to the west of the main mine shafts is the best option. The two buildings will normally yield one or two chests, plus weapons and ammo. That puts you in a decent position to sneak up on Shifty Shafts. By the time you get there, the gunfights will largely be over, and the victors will be in looting mode, so you can catch them unawares.
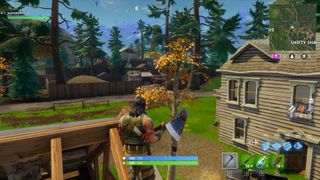
Also, many people still don’t know the chest locations at Shifty Shafts, so even if it was busy you can nab one or two chests. Stay above ground and keep your ears pricked.
On top of the western mountains
The houses south of Snobby Shores
Again, another risky one that I’d only recommend solo, but it’s useful if you’re planning to drop in Snobby Shores and change your mind because you see too many enemies. The two houses will yield at least two chests—don’t miss out on the basement underneath the southern one.
If you have good enough gear you can head north and ambush anyone trying to escape Snobby Shores. Or, if you’re feeling less confident, head south along the coast. You’ll come across a clearing that more often than not will have a chest out in the open: it’s the brown patch northwest of Greasy Grove on the map.
Tilted Towers is undoubtedly a fun spot to drop, but it can be a little hectic. A good alternative is to head a little further west, where you’ll come across a cluster of buildings, one of which hides an indoor football (or soccer, if you’re so inclined) field.
That field is a good place to start: there are guns on the pitch, and a chance of chests at either end of the arena. From there, make your way to the building to the west, which often contains loot chests.
If you’re all geared up then you can chance your arm back at Tilted Towers and hope that most people have left (and left some chests behind). If you want to keep a low profile, head directly northeast to Loot Lake.
Well, there you have it. This is by no means an exhaustive list, but it should get you started. Where’s your favourite place to drop?