
When concepting creatures in ZBrush, presenting your idea as a greyscale, unposed piece of 3D art can make it hard for an audience to realise your vision.
Equally when using Photoshop CC, it might take you some time to achieve a three-dimensional feel to your design. So in this workshop, I’ll walk through how to combine both tools to turn a loose concept into a fully realised idea, playing to both programs’ strengths. Watch the video and follow my process below.
A basic understanding of ZBrush is necessary, but only the basics because we won’t need to use any advanced techniques or workarounds. Essentially, I’ll be using ZBrush to block out a design with ZSpheres, shape it and render some coloured and lit images, and then composite those together in Photoshop.
I’ll then use a range of surface samples to bring that design to life, adding skin surface, lighting effects, and a textured environment. It’s a great quick way to present a concept for an idea, without having to take it through a complete 3D pipeline.
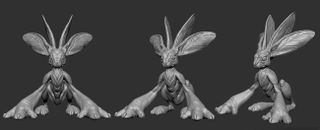
01. Start ZSpheres block-out
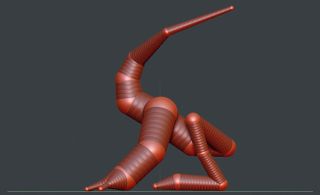
Quickly sketch out your character using ZSpheres
I like to use ZSpheres to rough out the entirety of my character as a first block. It gives me a better sense of the whole shape, and forces me to focus on areas of the sculpt other than the head, which is the clear temptation. In this case, my idea is to create a kind of magical forest hare.
02. Make rough concept
Use the Clay buildup brush to rough out your concept in more detail
Mostly I’m just using the Clay buildup brush to roughly shape the concept. The aim is not to be bogged down with making it look good – it doesn’t. I just want to brainstorm an idea. I want to make the ears look like leaves, and I’m trying out an idea where his skin would imitate bark, and possibly have mushrooms growing on it. My inspiration for this are the faerie-like creatures from Guillermo del Toro’s films, such as Pan’s Labyrinth.
03. Paintover in Photoshop
Take your rough model into Photoshop to define it further
After about 30 minutes or so I take a screen grab of my loose idea and bring it into Photoshop. Here I can eliminate the weakest areas, and sketch up areas that I want to change or develop further. I’m going to eliminate the mushroom idea, and focus on the four leaf-like ears as the defining characteristic of this creature.
04. Use ZSpheres for new build
Now start a new build and block it out with ZSPheres, using your paintover as a guide
I’m starting from ZSpheres again to block out the main build. This time I’ll load in the paintover as an image plane and use it to line my concept up. It’s worth taking your time to get the base shape right with the ZSpheres, because it’ll save you from having to retopologise or dynamesh the mesh multiple times later.
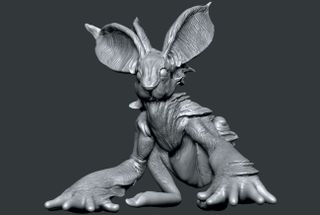
05. Create a basic sculpt of the creature
Start working your build into a more detailed sculpt
Using my paintover as a guide, I can quickly block in the larger forms of my creature. I’m primarily using Clay buildup, Move and Dam standard brushes for this. I also use the Mask function by holding down Ctrl to isolate specific areas such as the nails. To create the eyeball, I use the Insert Sphere tool and then separate it to a separate sub-tool.
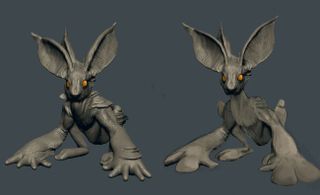
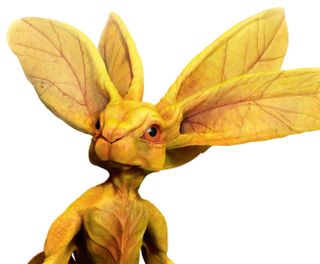
06. Polypaint the forest creature
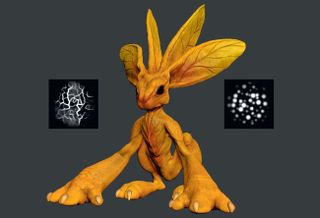
Use ZBrush’s Spotty and Veiny alpha maps to give your character’s skin a mottled look
To create a basic skin tone for my creature I set the material to SkinShade 4, and flood the colour with a bright orange. I then place an inverse mask on the cavity to darken up the recesses, and use a combination of ZBrush’s default Spotty and Veiny alpha maps to create a distinctive mottled pattern to the skin using red, yellow and brown tones.
07. Light the scene and vary the background
Try out a variety of backgrounds to see what works best
I want to ensure I get the lighting direction correct when I comp this into my background, so I bring in a number of different background options as image planes, to see what works. My lighting setup is basic: I have my main light and a rim. I’ll create everything else in Photoshop.
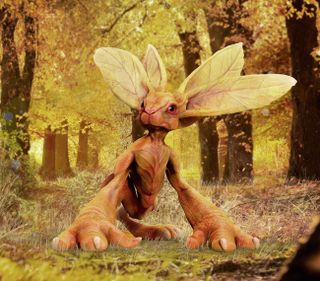
08. Pose the figure to convey an emotion
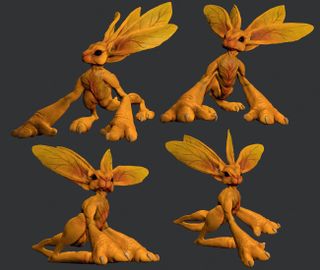
Experiment with your creature’s pose to try and convey its personality
Once I’m happy with the lighting and general concept, I quickly alter the pose to be less symmetrical. I do this using Masks and the Transpose tool, to mask out the limbs, head and torso, then rotate it into a more interesting position. I’m trying to create the impression that this creature is coming out of hiding, and is a little timid or curious. The pose is a great way to convey this to the viewer.
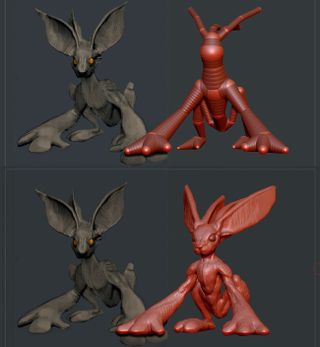
09. Render the woodland beast
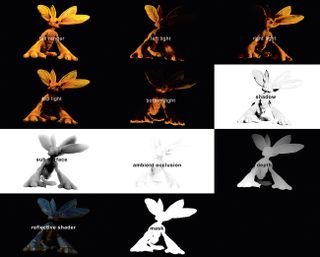
Export the shadow, ambient occlusion, depth, sub surface and a mask as separate passes
I’m rendering in Preview Quality mode, which is the default setting. First I render out my basic shaded/lit image, by pressing the BPR button and exporting the document. Then, using only the main light, I reposition it to render out light information as separate passes from the left, right, top and bottom. Finally, from the Render menu and BPR RenderPass options, I export out the shadow, ambient occlusion, depth, sub surface and a mask as separate passes – all in PDF format.
10. Assemble the renders in Photoshop

Take your passes to Photoshop and stack them as separate layers
To assemble all your passes, simply stack them as layers in one document in Photoshop. I then convert all my lighting passes to Screen mode and adjust the Opacity to decide how much directional light I want on my creature. This creates a ‘cheated’ global illumination look. I also add in my shadow pass on a Multiply layer and use the mask I’ve create on the group folder of all my passes. This means I can work on my creature and background separately.
11. Add texture to skin surface
Try an assortment of images to create a good skin texture
I’ve assembled a bunch of images to try on his skin surface to add a little noise. The first one I want to apply is an actual leaf texture, so he has the sense of being crafted from nature. I’m also applying some elephant skin along his arms, and some heavy leaf detail to the ears.
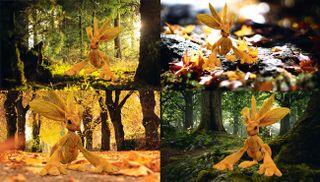
12. Alter the background to suit the character
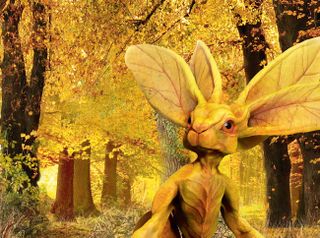
If your background isn’t working, bring in a new one
I don’t like my current background image. I want the environment to appear wilder and more magical. The colours are great though, so I blend in other autumn woodland scenes to fill in the blank spaces between the trees, then add some foreground elements.
13. Add filters/vignettes
Gradients and vignettes will help tone your image and add focus
Gradients and vignettes can frame your work nicely, I use these as Overlay layers to focus the lighting on the character in the middle of the image. I’m going to use a vignette with oranges and circles to give a subtle magical tone to the background, and also a vertical gradient to darken the edges of my images. This helps to place the focus to the character in the middle.
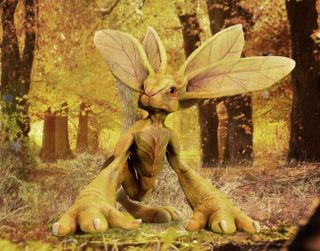
14. Final environment touches
A few final touches and you’re good to go
In order to sit my character comfortably in the environment, I duplicate the group, merge it and then blur the image. I then apply this as a layer mask and try to match the focus of the background image. I’m also painting in straw and moss at his feet to blend with the foreground image, and faking a little shadow underneath him. Now my creature concept is ready for his close-up!
This article was originally published in issue 162 of ImagineFX, the world’s best-selling magazine for digital artists. Buy issue 162 here or subscribe to ImagineFX here.
Related articles: